Table of Contents
- Intro
- Objectives
- Design
- Program Layout
- Testing
- Further Work
- Contributors
- Budget
- Acknowlegements
- Software
Item Tracker Project
This is a proof-of-concept system designed to catalogue, track, and recover a user's items. Check out our Youtube Video too!
Introduction
The idea for the Never Lost project originated because both of us carry around reusable water bottles that we sometimes misplace. We wanted to create a device that would keep track of whether our water bottle, or any other item, was present and if not, give the the location of where it was left. After running through multiple ideas, we decided to create a system that would utilize RFID to tell if our item was present and GPS to record our location, which could be displayed to us at a later point if our item was missing.
The purpose of the RFID module is to periodically check if your item is present. By attaching the RFID tag to your item and placing it near the module, it can scan the tag. A successful read means the item is there and an unsuccessful means the item is likely missing. In order to make our code efficient, the RFID tag is read periodically in an interrupt, setup by the python Signals library. This library allows us to specify which function is the interrupt handler as well as the interval between interrupts.
Since the RFID module has a short range, we have implemented some features to improve our design. First, in each interrupt call we attempt to read the RFID tag multiple times. This helps prevent the case where our item is present, but a single bad read results in the item "missing". We then added a query to the user if we cannot detect their item. Instead of just automatically showing them the last GPS coordinates of the item, we first ask them if they are missing their item. For example, a user who removes the item from their backpack to hold can now decline the option to search for their object.
Our last improvement is that regardless of the state of the program, (Initial welome state, query state or finding state), the RFID interrupt always occur. If the RFID tag is read at any point, we transition to the 'Initial Welcome State', which indicates that your item is present. This was a crucial addition as it allows for the program to self correct a bad RFID read in a following period and minimizes the user's interaction with the touch-screen. They can simply replace the item near the RFID module and resume as normal.
The next part of our system is the GPS, where we used the Adafruit ULtimate GPS Breakout V3. We read GPS data at regular intervals, appending them to a list which essentially gives us the path that the user has been traveling. Whenever the RFID tag is successfully read, clear our list of coordinates and start over. This has dual functions of helping to keep our list to a resonable size and only saving the of coordinates to the last location where we knew the item was present. For example, if we travled from points A -> B -> C and we know our item was present at point B, there is not need to save the location of point A.
If the RFID tag is not read sucessfully, we ask the user on the PiTFT screen if their item is missing. They can respond with Yes or No. If they choose "No", we return to the main screen. If they choose "Yes", we then display the last coordinates where there item was detected by the RFID. These GPS coordinates can then be typed into Google Maps, giving you the location of your item.
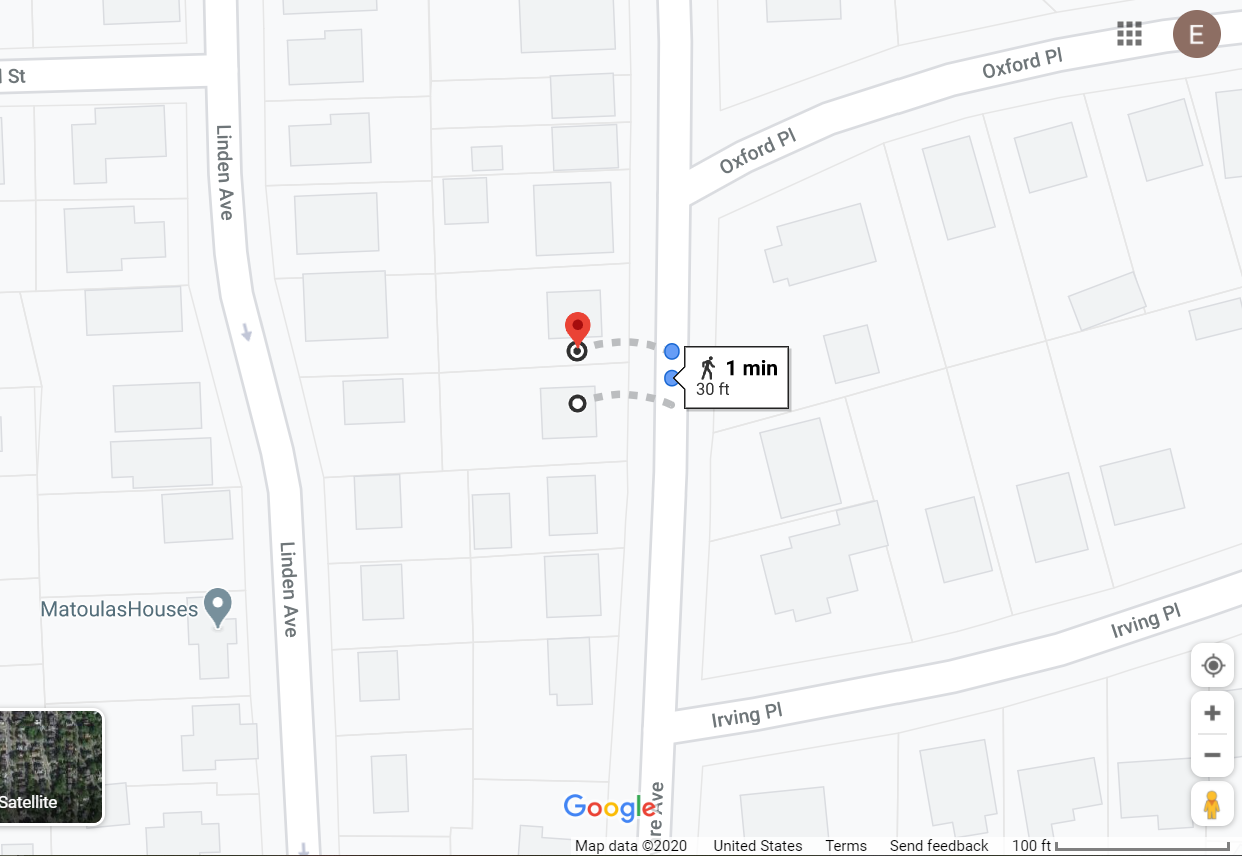
The GPS is quite accurate. From initial testing, our GPS was within 30 feet of our actual location. However, it is less reliable during snow storms.
Objectives
- Identify and track items with RFID tags
- Locate the user with GPS
- Provide the user with pathing back to a lost item
Design
We aimed to use minimal hardware with the goal of a portable, always-on, reliable and long-lived system. All power is sourced from the Pi, and with only the GPS and RFID module as extra components, there is not much to break on a hike or out in the city. Correspondingly, the code base is simple but easily extensible, following respected and useful design archetypes.
Dependencies and References
Python 3.7.3
CircuitPython Instructions here
GPS library
pip3 install adafruit-circuitpython-gps
RFID PN532-breakout board library
sudo pip3 install adafruit-circuitpython-pn532
GPS demo
https://learn.adafruit.com/circuitpython-on-raspberrypi-linux/uart-serial
The Pi 4 doesn't support UART, so the uart object is actually a Serial object using the "/dev/ttyS0" (tty S zero) pipe.
GPS Packet Datasheet: https://cdn-shop.adafruit.com/datasheets/PMTK_A11.pdf
UI
The basic states of the project can be summed up in a FSM.
Initial State: Welcome Menu with items
- Welcome text
- State of GPS lock (as current coordinates or 'No Lock')
- Button 'Quit'
State transition to Question State on one missed period with a tag.
Question State:
- Text "Is your item lost?"
- Button 'Yes'
- Button 'No'
State transition to Initial State on 'No'.
State transition to Finding State on 'Yes'.
Finding State:
- Coordinates of last known location of item
- Arrow following path (points to nearest waypoint, clearing waypoints if a new waypoint is within a radius or a new waypoint is nearer)
- Button 'Found'
State transition to Initial State on new valid read or 'Found'.
GPS:
The actions we take with respect to the GPS
Global Action:
- Read coordinates and store to a list
Initial State:
- Discards old coordinates on all transitions to Initial State (including loopback)
Question State:
- N/A
Finding State:
- Discard all new coordinates (for the lost item(s))
RFID
General RFID Information and Selection
We chose to use RFID over bluetooth, because the RFID tag is passive, requiring no external power. Using bluetooth, we would have to power both the bluetooth breakout module and the transmitter. We decided to use an RFID module that operated at high frequency, which is standarized at 13.56 MHz. Using higher frequencies allows you to read RFID tags further away, but diminishes the ability to read through materials. Since the item we are tracking will likely be placed in a backpack, we want to ensure we can read the tag through thin material.
Professor Skovira had the PN532_breakout board which is compatible for RFID, as well as RFID tags, so after reviewing the documentation we decided to use these. The only downside is that high frequency RFID has two different standards. The more common and easy to use standard is the ISO 14443 standard, which is what the PN532 uses. However, this RFID standard has a maximum reading radius of 10 cm, or about 4 inches. This means that our tag will have to be quite close to the PN532 module, but it is much easier to use than an RFID module using the the other standard, ISO 15693.
RFID PN532 Module: Documentation and Setup
In addition, you must enable the first SPI channel on the raspberry-pi, as the SPI0 is used by the PiTFT. This can be done by editing the /boot/config.txt file and adding
dtoverlay=spi1-1cs
Pin Configuration
| Function | RPi Broadcom Pin | PN532 Pin |
|---|---|---|
| MOSI | 20 | MOSI |
| MISO | 19 | MISO |
| SCLK | 21 | SCK |
| Digital | 26 | SSEL |
More docmentation can be found on the Adafruit Website
For specifics on the RFID module, look at the PN532 Datasheet
Global Action:
- Query periodically for tag
No states change this action, though several state transitions occur depending on the result of the action.
Hardware
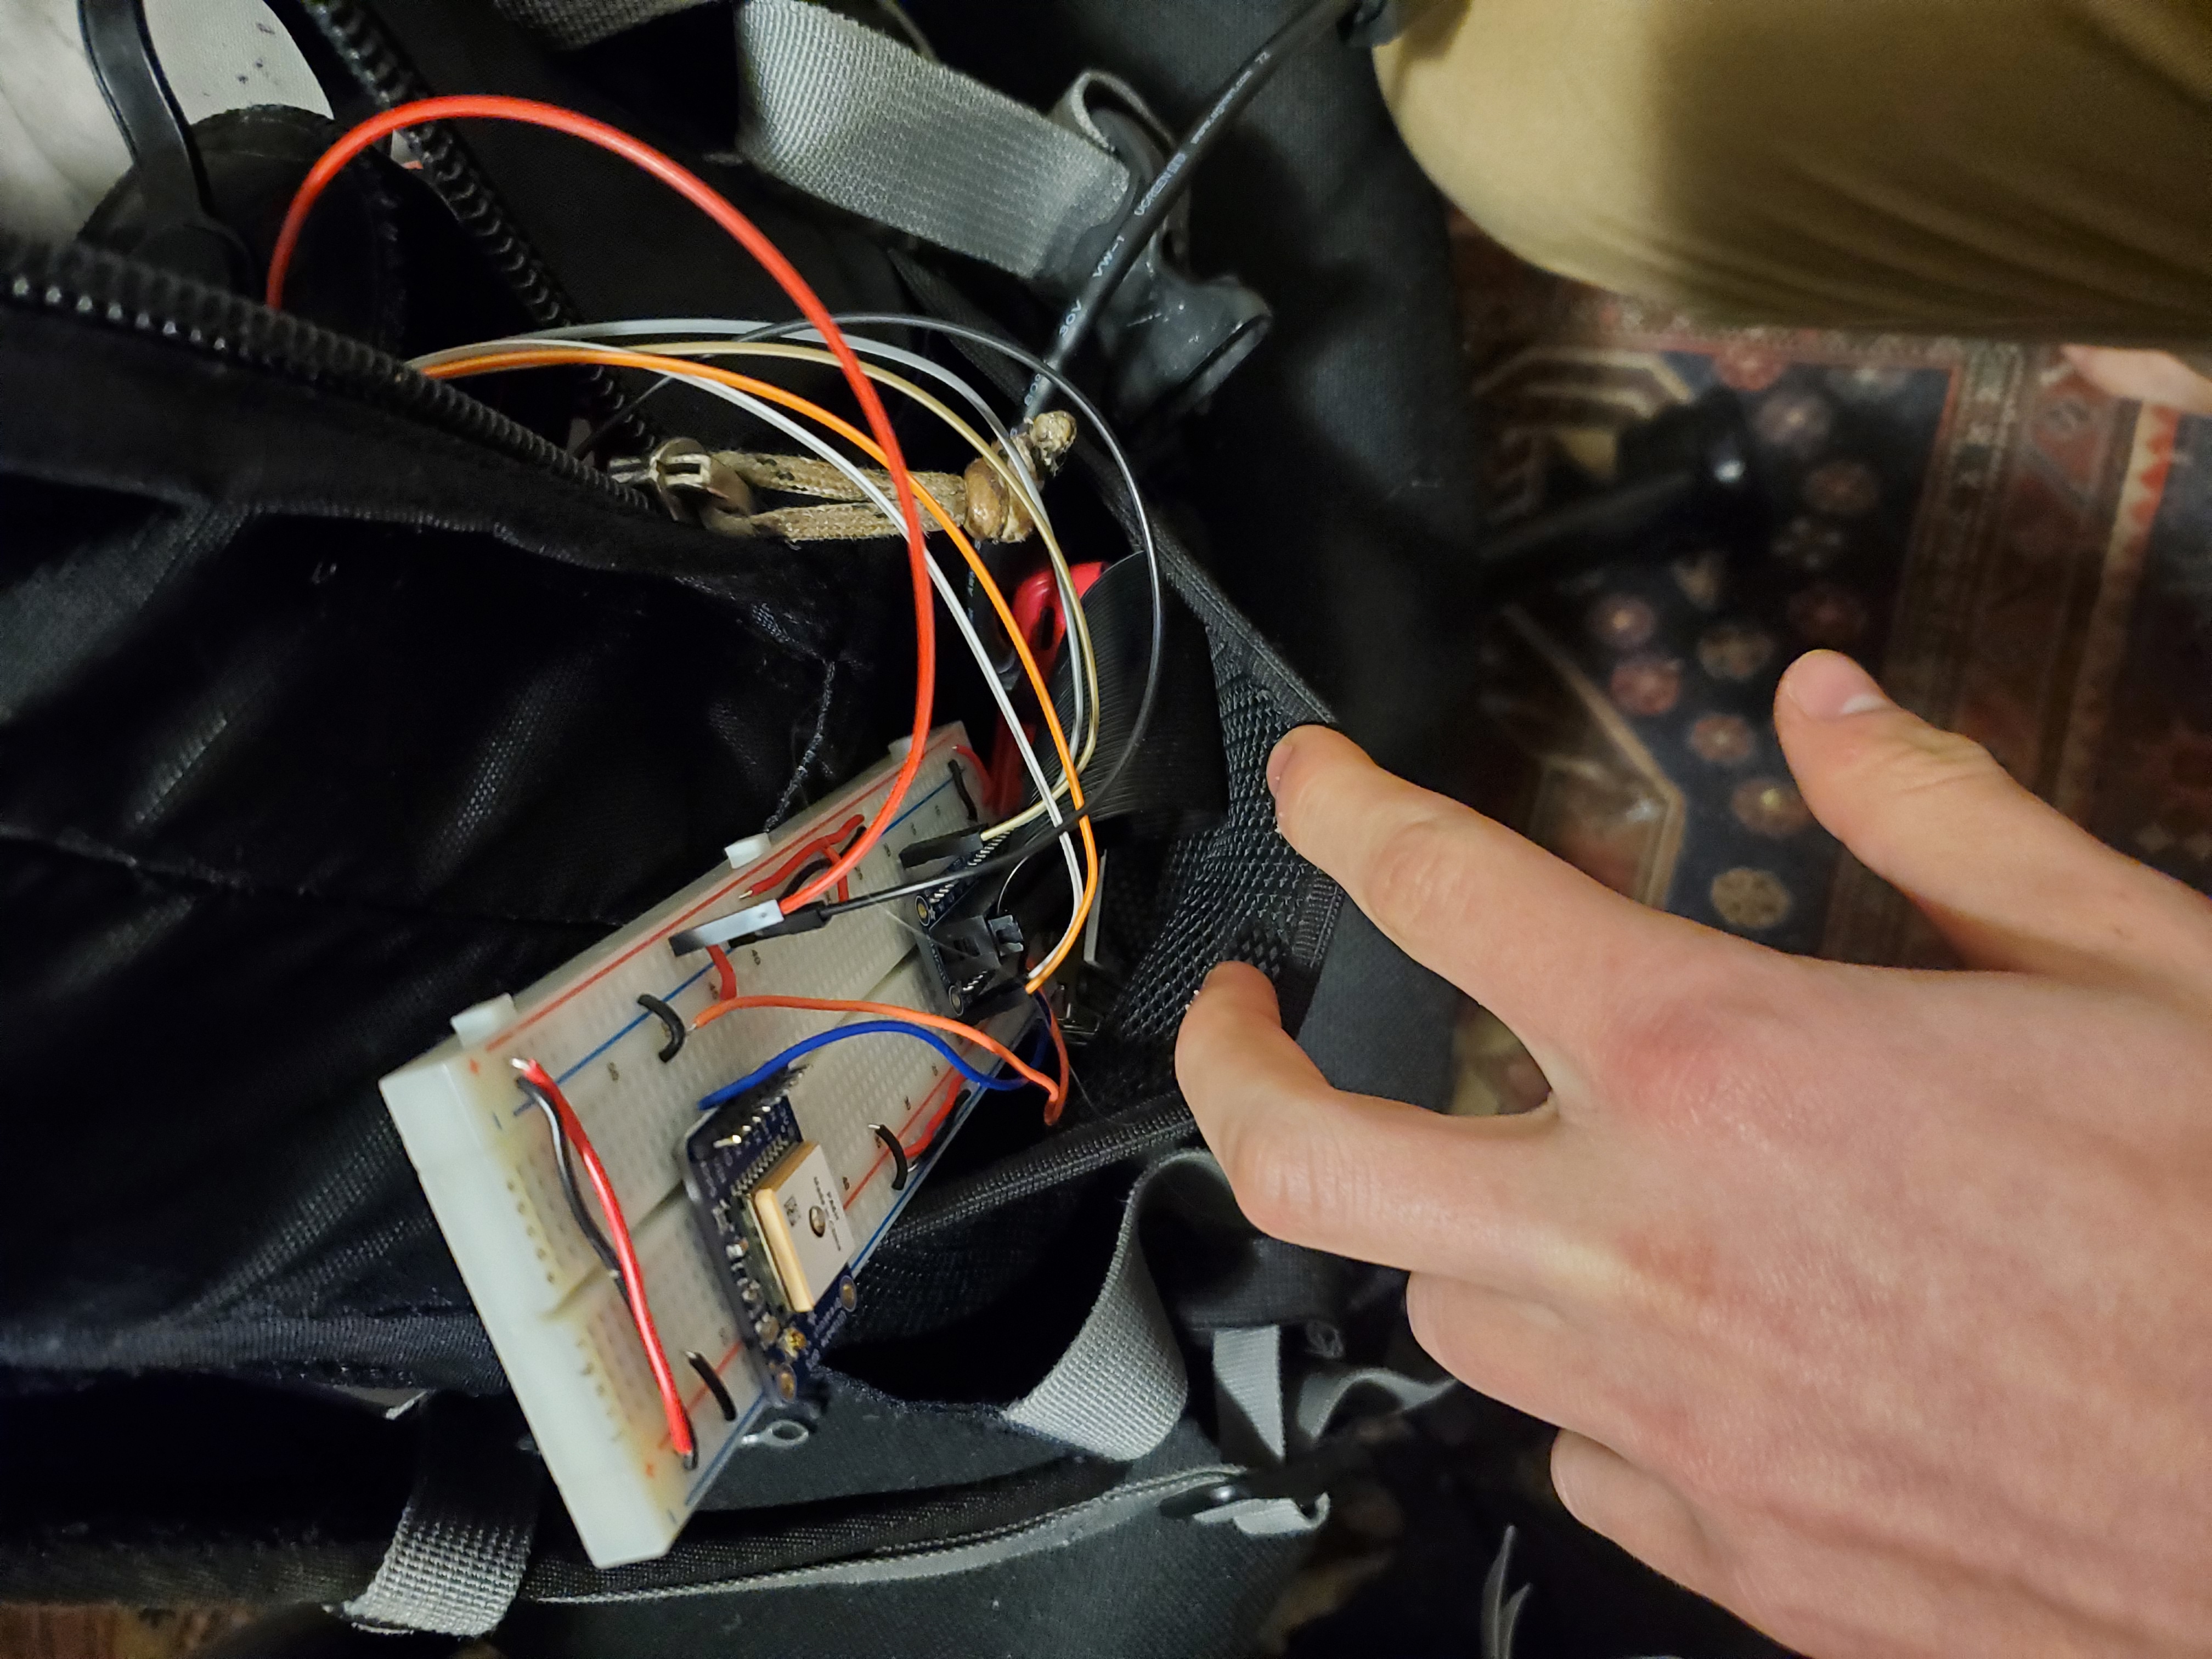
Our harware was not overly complicated. We soldered headers to the GPS module so we could plug it directly into the breadboard and used jumpers to connect the RFID module to the breadboard. Our Pi was also connected to the breadboard via the breakout cables.
For real-world application of our project, you would place the breadboard and Pi outside of your backpack for the best results. This allows you to see and interact with the PiTFT screen and helps the GPS module keep a lock on the satellites. For example, we placed the Pi and breadbaord in the side pocket of our backpack.

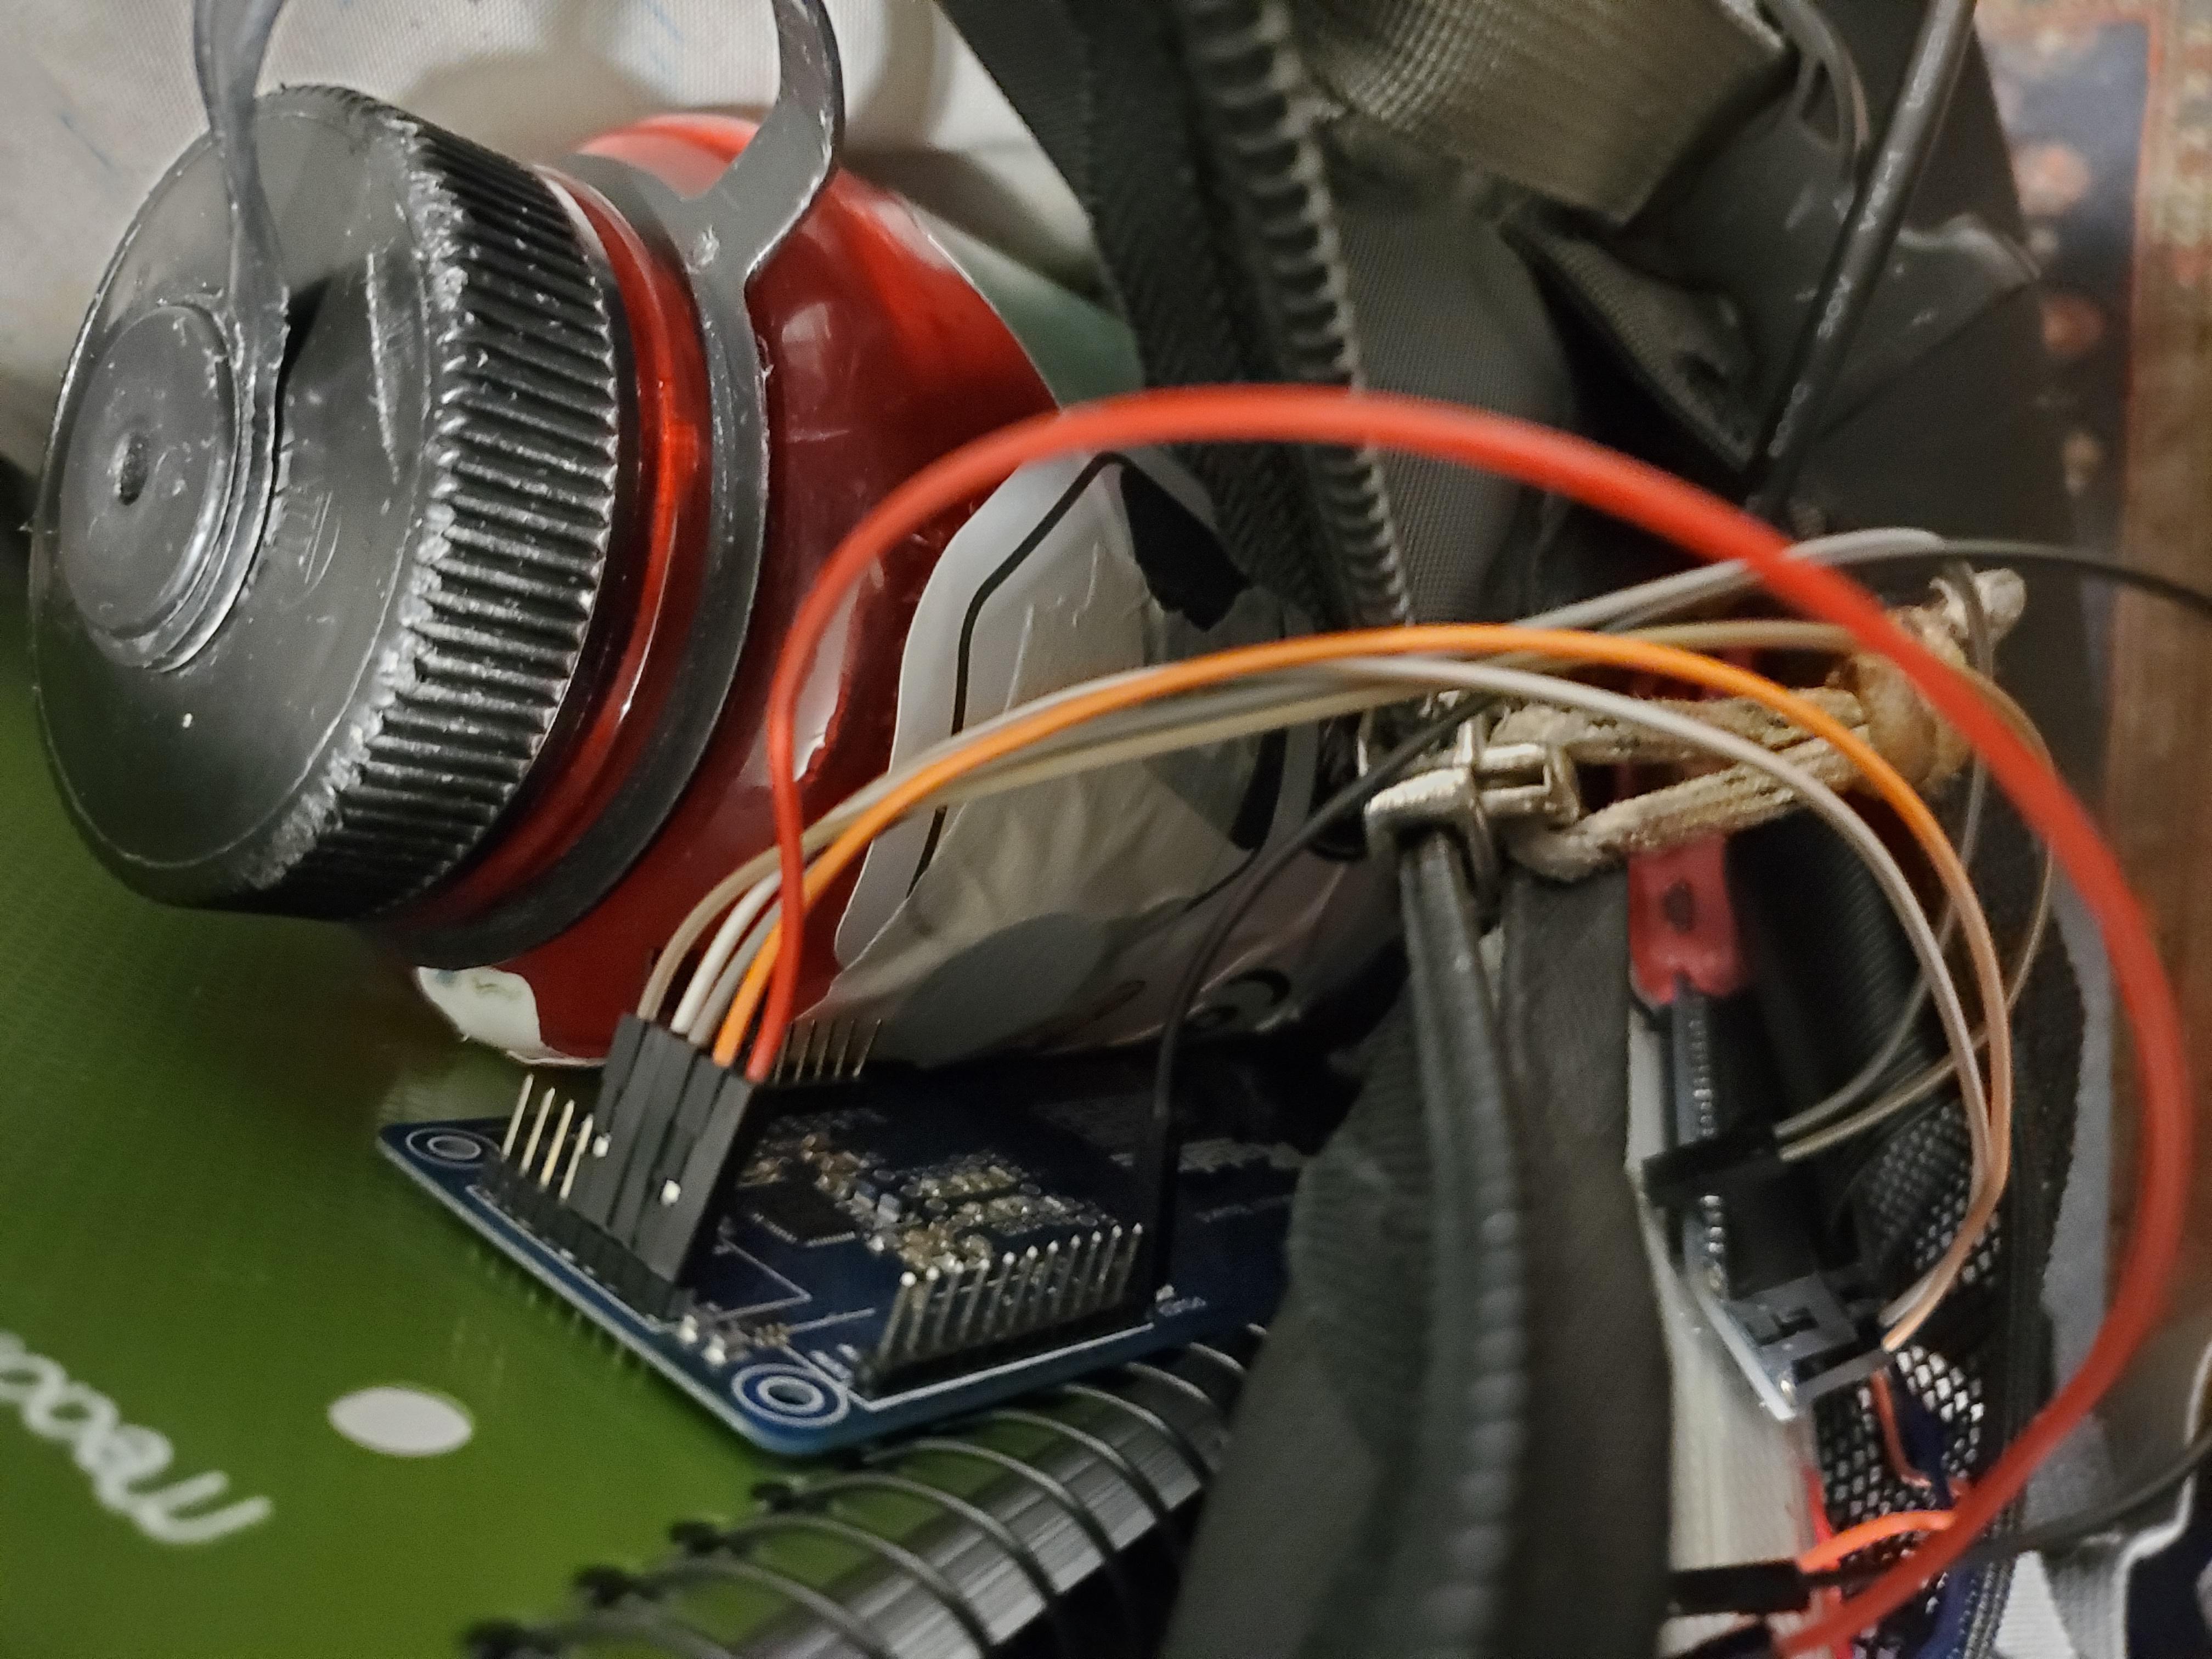
You can then place the item you are tracking in your bag with the RFID module. Keeping them close together is important so the RFID module can read the tag. Here, you can see a small circular RFID tag taped to my water bottle, near the RFID module. It is secured inside the bag by other notebooks and binders.
User Input
See UI 'Buttons'.
Program Layout
RFID Layout
The RFID module is encapsulated in an RFID class that contains:
- An interrupt scheduled by the constructor.
- A boolean variable whether the tag has been successfully read this period.
- An integer counting the number of periods.
- Associated helper functions.
GPS Layout
We are using the Adafruit GPS class, documentation can be found here
UI Layout
We have custom-written classes for Buttons (general displayable text) and Images, mostly written for previous labs.
The Image class has been expanded upon to enable rotatioon.
We designed the user interface to be simple to engage with at a glance, by keeping all information front and center and buttons to the bottom. The FSM design
Testing
We tested each component with minimal software, independently of each other and the main UI to simplify the debug process. The assembly of the devices is not complicated, and did not warrant extensive stressing. The GPS module was similarly simple to engage with, by using a currently maintained and easy to use library provided by Adafruit.
Testing the RFID module was slightly more complicated. Enabling and using a second SPI channel was necessary since the PiTFT uses SPI0. After the setup, we then looked for the best way to create a timer interrupt, so we could read the RFID tag periodically without polling. This makes our code more efficient and elegant. We decided to use the Signals library in Python, which allowed us to set a timer for our interrupt and define our interrupt handler.
Once this was copmlete we tested the RFID by attempting to read the tag's UID. We did this with several different tags and found the maximum range was about 4 inches for all the tags. We also tested to see if the tags could be read with other objects in the way and this was mostly successful. In general the tags could be read through any thin object that kept the tag witin 4 inches of the RFID module.
Testing the entire system was relatively simple, once we were confident in the RFID and GPS subsystem performance. We discovered some bugs in our UI code by exhaustively testing every input combination, though that methodology is only feasible because we were careful to keep the interface minimal. In our testing, we also discovered that the GPS library returns non-numeric values if it does not have a lock on satellites, and ended up adding an extra state to the application to account for it.
Further Work
Currently the power draw for the entire system is at the edge of what the Raspberry Pi can reliably source, much less a smaller chip. Due to the simplicity of the code, it is reasonable to cram the system into a small chip to be placed in a bag or pouch, and a partner app. While using a GPS in the system is interesting, nearly everybody carries a more accurate and powerful device with them at all times, and leveraging it in tandem with specialized hardware geared towards tagging and tracking items is the logical next step for development.
Contributors
| Eric Kahn (edk52) | RFID software, testing, and project hardware. |
| Eric Hall (ewh73) | GPS software, testing, and UI |
Budget
| Item | Price |
|---|---|
| RFID Module + Tags | $39.95 |
| GPS Module | $39.95 |
| Total | $79.90 |
Acknowledgments
| Prof. Skovira | For teaching ECE 5725 and providing the RFID module, and advice on the detection system |
Software
Visit our Github for the source!
To run at startup, add sudo /path/to/main.py to rc.local.
(main.py)[https://github.coecis.cornell.edu/edk52/5725_FinalProject/blob/master/main.py]:
import RPi.GPIO as gpio
import time
import os
import pygame as pg
from pygame.locals import *
from UI.Button import Button
from UI.Image import Image
import serial
import adafruit_gps
from RFID.RFID import RFID

time.sleep(1)
print('Running main.py!!!!')

# =========-Functions-==========
from serial.tools.list_ports import comports

# =========-Functions-==========
found_serial = False
while not found_serial:
    for port in comports():
        if port.name == 'ttyAMA0':
            found_serial = True
    time.sleep(0.2)

# =========-Constants-========
timeout = 120
BLACK = 0,0,0
DARKGREY = 20,20,20
WHITE = 255,255,255
size = w,h = 320,240

qpin = 27
framerate = 15.0
starttime = time.time()

# =========-GPIO-==========
gpio.setmode(gpio.BCM)
gpio.setup(qpin, gpio.IN, pull_up_down=gpio.PUD_UP)

# =========-SYSTEM VARS-==========
os.putenv('SDL_VIDEODRIVER', 'fbcon'                 )
os.putenv('SDL_FBDEV'      , '/dev/fb0'              )
os.putenv('SDL_MOUSEDRV'   , 'TSLIB'                 )
os.putenv('SDL_MOUSEDEV'   , '/dev/input/touchscreen')

# =========-PyGame-==========
print(pg.init())
pg.mouse.set_visible(False)
screen = pg.display.set_mode(size)
mid_font = pg.font.Font(None, 50)
small_font = pg.font.Font(None, 30)

# ========-Text-========
main_text = Button(mid_font, 'Welcome!', (160,50), WHITE)
curr_pos = Button(small_font, "{0:.4f}, {1:.4f}", (160,80), WHITE, defaultfmt=(0,0))
quit_btn = Button(small_font, "Close", (w/2,h-30), WHITE)

yes_btn = Button(small_font, "Yes", (50,h-30), WHITE)
no_btn = Button(small_font, 'No', (w-50,h-30), WHITE)

item_text = Button(mid_font, 'Your item is at:', (160, 50), WHITE)
item_pos  = Button(mid_font, '{0:.4f}, {1:.4f}', (160, 100), WHITE, defaultfmt=(0,0))
found_btn = Button(small_font, 'Found', (w/2, h-30), WHITE)

# ========-Images-========
#pointer  = Image("Resources/pointer.png", (50,50), [0,0], (w/2 - 50, h/2 - 50))

# ============-Objects-==============
uart = serial.Serial("/dev/ttyS0", baudrate=9600, timeout=3000)
gps = adafruit_gps.GPS(uart)
rfid = RFID(2, 10)
clk = pg.time.Clock()

# ==========-Variables-============
gps_hist = [(None, None)]
mousecoords = 0,0
quit = False
yes = False
no = False
found = False

# =========-FSM-==========
STATES = [
  'Initial', # default state
  'Welcome',
  'Question',
  'Finding'
]
STATE = 'Initial'

# ========-Game Loop-========
try:
    while gpio.input(qpin) and not quit:
        # First step of each loop is to read events, do updates, and tick the clock
        clk.tick(framerate)
        yes= False
        no= False
        found= False

        gpsevent = False
        if gps.update():
            gpsevent = True

        rfidevent = False
        if rfid.update():
            rfidevent = True

        mouseevent = False
        for event in pg.event.get():
            if event.type is MOUSEBUTTONUP:
                mousecoords = pg.mouse.get_pos()
                mouseevent = True

        # Mouse event state interactions
        if mouseevent:
            if  STATE == 'Initial' or STATE == 'Welcome':
                if quit_btn.pressed(mousecoords):
                    quit=True
            elif STATE == 'Question':
                if yes_btn.pressed(mousecoords):
                    yes=True
                if no_btn.pressed(mousecoords):
                    no=True
            elif STATE == 'Finding':
                if found_btn.pressed(mousecoords):
                    found=True

        # GPS event state interactions
        if gpsevent:
            gps_hist.append((gps.latitude, gps.longitude))

        # State transitions:
        # Default is 'Initial'
        # Transfer to 'Initial' if gps loses lock
        if STATE not in STATES or (gps_hist[-1][0] is None):
            STATE = 'Initial'
        # Continually clear GPS history until we get a lock
        # Transition to Welcome once we get a lock
        if STATE == 'Initial':
            if gpsevent:
                if gps_hist[-1][0] is not None:
                    STATE = 'Welcome'
                else:
                    gps_hist.pop()
        # Transition to 'Question' from 'Initial' if missed period with tag
        # On loopback transition, clear the GPS coordinates history
        elif STATE == 'Welcome':
            if rfidevent:
                if not rfid.isItemPresent():
                    STATE = 'Question'
                else:
                    coords = gps_hist[-1]
                    gps_hist.clear()
                    gps_hist.append(coords)
        # Transition to 'Finding' from 'Question' if Button Yes
        # Transition to 'Welcome' from 'Question' if Button No
        elif STATE == 'Question':
            if rfidevent and rfid.isItemPresent():
                STATE = 'Welcome'
            elif yes:
                STATE = 'Finding'
            elif no:
                STATE = 'Welcome'
        # Transition to 'Welcome' from 'Finding' if Button Found or new period with tag
        elif STATE == 'Finding':
            if found or (rfidevent and rfid.isItemPresent()):
                STATE = 'Welcome'

        # Rendering cell
        screen.fill(DARKGREY)

        if STATE == 'Initial':
            main_text.set_text('Waiting for GPS!')
            screen.blit(*main_text.render())
            screen.blit(*quit_btn.render())

        if STATE == 'Welcome':
            main_text.set_text('Welcome!')
            screen.blit(*main_text.render())

            curr_pos.fmt(gps_hist[-1])
            screen.blit(*curr_pos.render())

            screen.blit(*quit_btn.render())

        if STATE == 'Question':
            main_text.set_text('Is your item lost?')
            screen.blit(*main_text.render())

            screen.blit(*yes_btn.render())
            screen.blit(*no_btn.render())

        if STATE == 'Finding':
            item_pos.fmt(gps_hist[0])
            screen.blit(*item_text.render())
            screen.blit(*item_pos.render())

            # If/when we figure out pathing:
            # pointer.rotate(10*(mousecoords[0]-mousecoords[1])/(1+mousecoords[0]+mousecoords[1]), absolute=False)
            # screen.blit(*pointer.render())

            screen.blit(*found_btn.render())

        pg.display.flip()
except KeyboardInterrupt:
    gpio.cleanup()
    pg.quit()

gpio.cleanup()
pg.quit()